|
|
Disclaimer: This instruction worked for me, there's no guarantee it will work in your car the same way. If you follow this instruction of modifying your car, you will do it at YOUR OWN RISK.
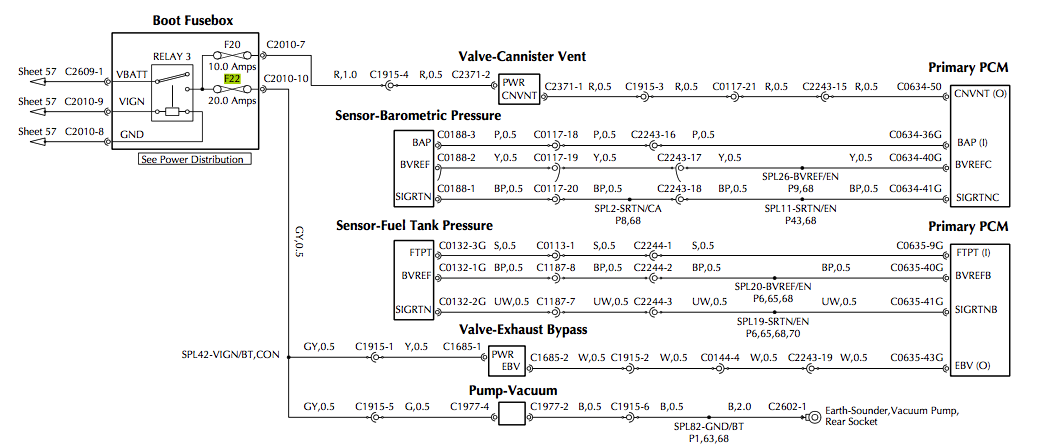
Fuse 22* in the trunk of many AMs is the fuse to the circuit which controls the exhaust valves: below aroung 4000 rpm the valves are closed to match noise regulations. Above that the valves are opened. Removing the fuse permanently interrups that circuit and the valves are always open. If you want to have the uncorked sound at your will, you need to have a switch installed.
* For most of the AMs it's fuse 22, for some - especially the newer models it might be a different fuse. See your owner's manual which fuse controls the exhaust valves.
Please note: As you pull or switch off F22, you're not only opening the exhaust valve, a pump is also connected to this fuse according to the circuit diagram:
There are two ways of switching:
But let's go through it step by step.
Open the boot, remove the emergency triangle.
Remove the four Torx screws that hold the amplifier cover in place. Remove amplifier cover.
Remove the two Torx screws that hold the SatNav DVD player cover in place. Remove the cover but pulling out and down.
Remove the bulkhead trim. It is held in place by fir trees only. Be careful at the sides and the top (where the triangle was).
Bring both seats to frontmost position.
For both back seats: Remove seat cushion by pulling upwards and forward. It's held in place by velcro tape only. Then remove both lower back rest covers. They are also secured by velcro buttons only. Then you will find two 7mm screws that hold each upper backrest in position. Remove them. There's also a third screw, which belongs to the side panel. No need to get that out.
Remove the back rests of each rear seat: Gently pull at the bottom (for 5mm) since the rest usually is somewhat adhered to the aluminium body shell. Once loose, move the whole backrest upwards for about 3cm, then "take" it out. No need to remove the seat belts. Actually there's no need to take the backrests out completely. We just need to get to the screws and have enough space for getting to the top shelf middle part.
Remove the trim right below the subwoofer mesh: Pull upwards at the very front. It's secured by a fir tree only. Remove the panel. Unscrew the two screws that hold the subwoofer mesh. Remove the mesh.
Now two screws become visible that hold the top shelf middle part in place. Remove the screws, lift the front part of the middle shelf gently and pull forward. There's the rear braking light cable that you should pay a little attention to. Unclip that in case you want to take out the whole middle part.
From the boot: Route the cable from the rear fuse box behind the boot trim up to the DVD player and through the bulkhead next to the player.
From the passenger cabin: Grab the cable from next the DVD player and pull forward until cable is of sufficient length
- Description on how to hide cable under centre console trim will be added later -Reinstall cabin trim in reverse order: Install top middle shelf. Make sure the brake light is connected. Fix with two screws. Next install subwoofer mesh with two screws, then install lower back center console part (one fir tree). Install rear seat backrest upper parts. Make sure the metal clips are in position when pushing the backrest down. Then fix each backrest with two screws (7mm heads). Push lower backrest panels into position. The longer side is the upper side, the straight side is outer, the angled side goes behind the seat belt on the inner side.
It is up to you where you want to install the switch. Suggestions are: Use an existing switch that you hardly use (e.g. boot open switch?), install a new switch in the ashtray cubby (if non smoker pack installed), install in front cubby (doesn't work in manual cars, however), install a new switch in a hidden position (e.g. under rear seat cushion; but that might be hard to operate, or under drivers seat).
When conecting the cable make sure that your new fuse comes right after the positive connector. In order to check, use a multimeter: Pull fuse 22, measure the voltage against ground (body) at each connector. The one that reads about 12 volts is the "hot" wire and needs to be protected by the fuse. From the hot connector (and via fuse) continue to the switch and then back to the cold connector in the fuse box.
Alternatively, you can put a fuse to each side of the connectors.
Make sure all connectors are fitted with insulating connector caps.
Reinstall the boot trim in reverse order: Put trim into place, pay attention to triangle fasteners, fix firtrees, remount DVD player cover with two long Torx screws, put amplifier cover into place again, fix with 4 Torx. Put triange back into place.